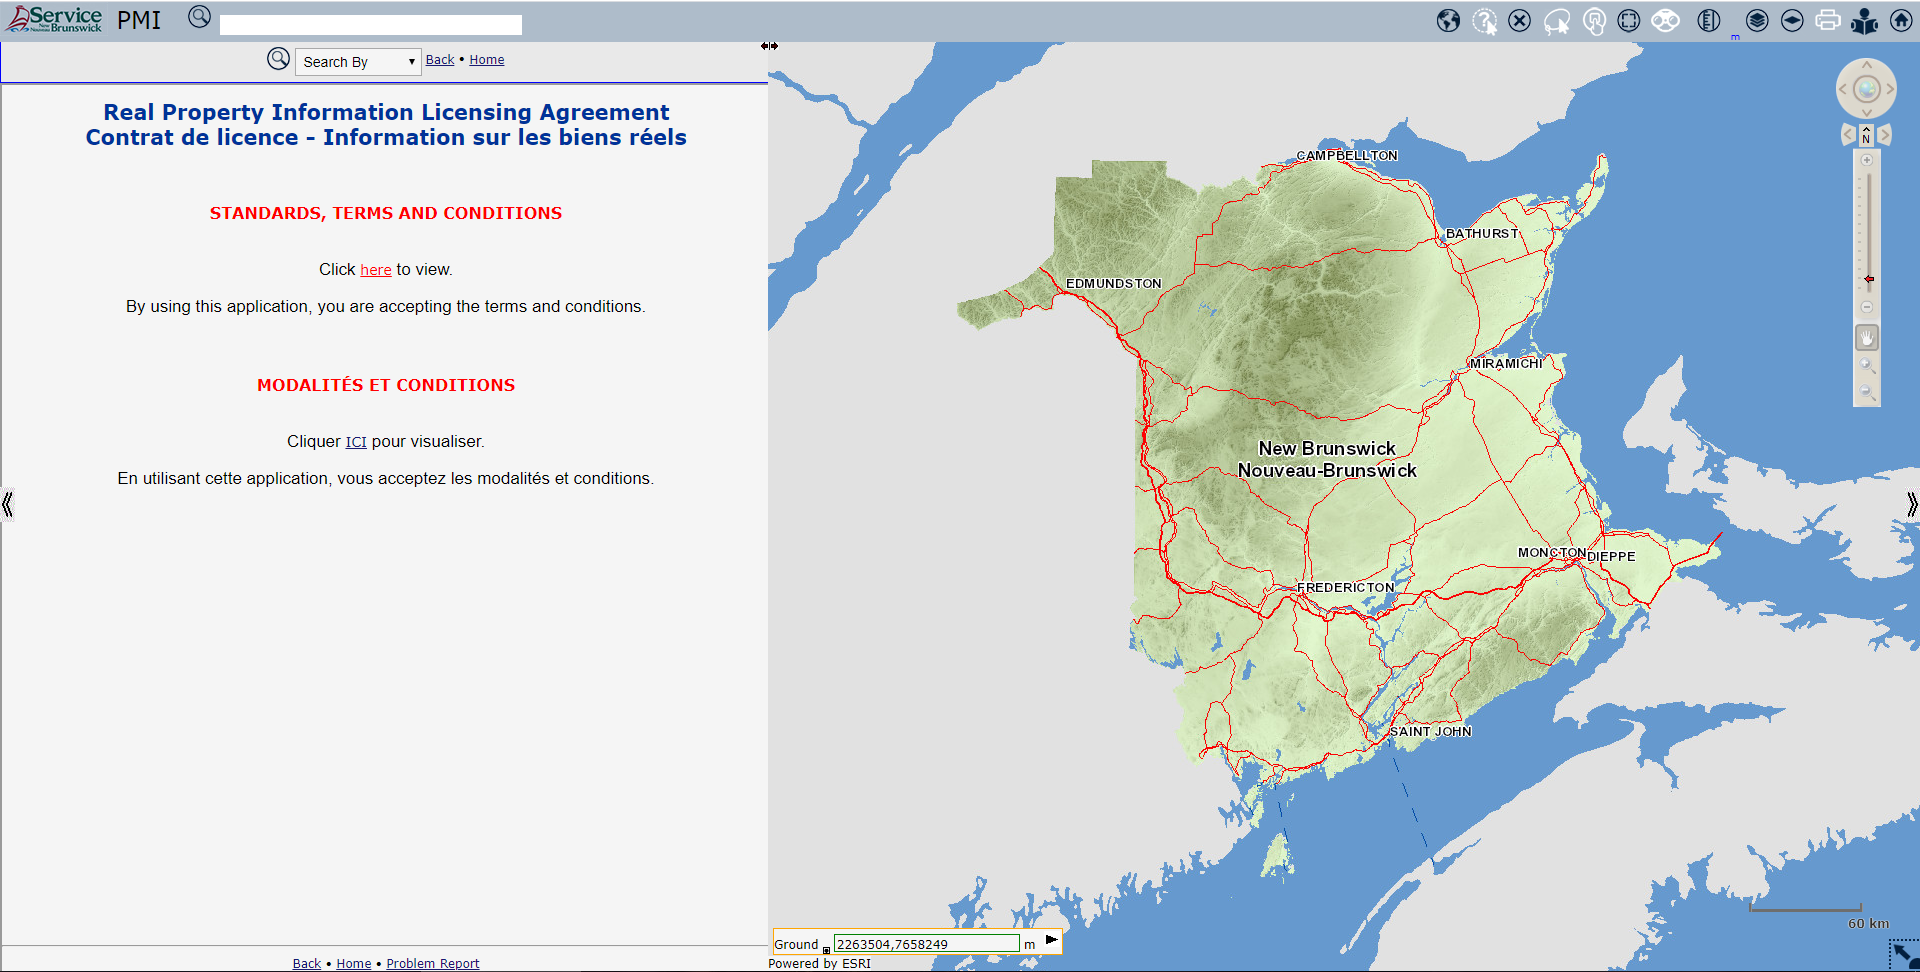
Applet Start Screen - Provider
- The SNB General Browser Mapping Applet is provided for use and developed by ...
- Use of this tool is governed by the standard terms and conditions outlined in this document.
- Purpose
- The SNB General Browser Mapping Applet allows users to interactively search for properties, view graphical information from various provincial data sources, generate parcel information reports and print maps in several sizes and scales.
- Functions
- Searches/Queries: Users can search for properties and information using PIDs, PANs, Names, Locations, Plans and/or Coordinates. Workflows of each case are shown below.
- Neighbours Owners, and value comparisons: Users can run several comparisons or property attributes, such as determining who owns a property, the value of adjacent lots, and many other analyses. The data contained in this application is very rich, and many of the links are interactive, allowing users to assess unfamiliar properties at a glance.
- Rough measurements: Users can take rough measurements of parcels if desired. A tool has been created expressly for this purpose, but even this special tool does not produce accurate parcel dimensions or boundary coordinates. For legally sound measurements and boundaries, users will need to contact the Land Registry branch for legal documentation.
- Report printing: Any selected properties can have their boundaries and data printed very easily, all on a single page. Much as with the above mention of measurements, these printed pages are not legal documents: They are merely rough representations of an actual property and its attributes.
- Provider
- The navigation bar sits on the right side of the screen and performs many functions that modify the viewport of the application.
- The default navigation method when the application first launches is the pan tool, symbolized by the open hand icon near the base of the nav bar. This allows users to click and drag on the map to move the centre point around.
- The two icons below this symbol are the zoom in and zoom out mode buttons.
- Both perform similarly, allowing users to click and drag on the map to draw a bounding box.
- When zooming in, this bounding box becomes the full extent of the viewport.
- When zooming out, the viewport retracts from the bounding box instead.
- The scale slider above the mode buttons allows users to jump to certain map scales by clicking anywhere in the slider. The centre point of the map remains the same while only the scale changes.
- At the top of the navigation bar sit the extent navigators and the overview button, symbolized by the globe icon.
- The overview button performs identically to the overview tool:

- The extent navigators slide the map viewport in the direction clicked: the left arrow slides the map one extent to the left, the right arrow slides the map to the right, and so on.
- Adjacent to the North indicator on the nav bar are the forward and back extent navigators: the left arrow jumps to the previous extent, and the right jumps forward an extent (and is only active if the user has already jumped to the previous extent at least once).
- The applet features two panes: the viewport (on the right side) and the data view (on the left side) panes. By default, both panes occupy the same amount of space on the screen, but this proportion can be modified as the user wishes.
- There are three tools that can modify the panes that are visible in this applet:
- There is a collapse arrow on the left side of the screen that will hide the data view pane and let the viewport fill the display area;
- a similar collapse arrow on the right side of the screen will hide the viewport, allowing the data view to fill the display area;
- The final tool is a slider that divides both halves of the applet. This slider can be dragged left and right to resize the amount of space allotted to each side of the applet to suit user preferences.
- This tool switches the mouse cursor from a drag cursor into a select cursor.
- This tool is only interactive when the map is viewed at scales in beyond 1:16000, which is the scale when the Parcels become visible.
- The user can then click on a parcel polygon to select it.
- Selected polygon attributes will then appear in the information pane, while the boundary of the parcel is highlighted in the viewport.
- Many portions of the information pane can be expanded or interacted with to gain additional information on the selected parcel.
- For more information on the information pane, please see the Menu Navigation section.
- If the parcel selected is outside of the viewport, users can click on the "Center Selection" tool to center the viewport on any selected parcels:

- To clear the selection users can click on the "Clear Selection" tool to clear all selections from the application:

- This tool switches the mouse cursor to a draw cursor.
- This performs in much the same way as the point select tool, but users can draw a polygon that encloses a series of parcel polygons to select them all at once instead of individually.
- Users can then click anywhere on the map to begin sketching.
- Clicking once places the first vertex, and each subsequent click adds a new vertex, and spans a line between the two points.
- Double clicking finishes the sketch, connecting the last vertex to the first vertex via a straight line.
- Any parcels that intersect the resulting polygon at any point will be selected.
- If the parcel selected is outside of the viewport, users can click on the "Center Selection" tool to center the viewport on any selected parcels:
- To clear the selection users can click on the "Clear Selection" tool to clear all selections from the application:
- This tool only functions when a selection has already been made through one of the two above options.
- Clicking on the icon will expand the selection to include all polygons that share a border with the selected polygon(s) and display all the newly selected polygons in the information pane.
- Each individual parcel can be zoomed to using the “goto” option to the right of its entry.
- Much like all other selection options, users can interact with and expand this information as needed.
- Switches the mouse cursor from a drag cursor into a select cursor.
- Unlike the select tools, this does not modify the information pane or select features: It generates pop-up windows instead.
- Only one pop-up can display at a given time, and they cannot be printed.
- These pop-ups display data such as the current owner, lessee, location (usually street name), land titles date and land gazette status for a property.
- There are three toggleable layers (data maps) available within this menu.
- When the application is first started, only the “GeoNB_SNB_Parcels” layers is toggled on.
- Users can use the toggle boxes in this tool’s drop-down menu to active two additional layers as desired.
- These additional layers include:
- GeoNB_SNB_Civic_Addresses, which displays address points;
- and GeoNB_SNB_NBHN, which displays waterbodies such as rivers and wetlands.
- If desired, all three layers can be activated simultaneously, or they can all can be disabled at the same time.
- Many of the tools within this applet rely on the GeoNB_SNB_Parcels layer being toggled on, so it is not recommended to disable this layer.
- Four basemaps are available for use, and users can select which basemap to display using this drop-down menu.
- The default basemap displayed is a topographic basemap, displaying roads, waterbodies, and other topographic features.
- The alternative basemaps include:
- an imagery basemap, which displays orthophotographs from various dates across the province;
- a grey scale basemap that performs as a simplified topographic map with much less color variation;
- and a historical basemap displaying crown grants and historical town plan documents.
- Only one basemap can be displayed at a time.
- Words
- Words
- Words
- Words
- Usage:
- This tool switches the mouse cursor to a draw cursor.
- Users can then click anywhere on the map to begin sketching.
- Clicking once places the first vertex, and the measurements that appear alongside the line segment adapt to the direction and distance from the mouse cursor.
- Users can click subsequent times to add additional vertices to the sketch.
- When the user has drawn most of their sketch, they can double click to finish the sketch, and the last vertex placed will snap to the first vertex placed.
- The area of the drawn polygon is then displayed within it.
- Clicking on the tool icon a second time will remove all existing drawn graphics from the map.
- These graphics cannot be printed.
- Changing Units:
- There is a small unit indicator below and to the right of the tool icon.
- This tool defaults to using meters, but by clicking on the ‘m’ users can select an alternative measurement system, such as feet, yards or kilometers.
- This tool launches a small window that the user can drag around the display area.
- This tool is intended to be used with features selected.
- Various settings can be tweaked within this menu, such as:
- the map scale, which can be modified by typing a desired scale in the text box, or by clicking on the small icon to the right of the text box and selecting a common reference scale from the drop-down menu. The print preview will immediately adapt to reflect this change;
- the map title, which is a simple text field that can be modified by the user which is then placed on the header of the printed document;
- and report template, which offers several common page sizes which will print the map on it’s own, centered on any selected properties, and a custom option labelled ‘Summary Report,’ which prints the map at a pre-set resolution and size, but also prints data related to the selected properties on the printed page as well, such as PIDs, PANs, owners and locations.
- Users can also zoom in on the page preview by clicking on the plus icon on the top right of the preview window and zoom out by clicking on the minus symbol.
- This tool can be used without any features selected, but this is not the intended use for the tool.
- If used without any features selected, the print tool will only print the current map area visualized and will not display any PID or PAN data if Summary Report is selected as the print template.
- Words
- Words
- Words
- Property Identification Numbers (PIDs) must be 8 digits in length, including leading zeroes.
- Examples include 01466689, 00000003, and 01437052.
- If multiple results are returned, users can click on the "Goto" binocular icon to jump the viewport to that parcel.
- PIDs between 00000001 and 00000004 are termed “interim polygons” and they display placeholder labels instead of unique PIDs:
- 00000001 labels represent crown reserve land;
- 00000002 labels represent water polygons;
- 00000003 labels represent public roads (that existed when the PID system was implemented. Newer public roads are assigned unique PIDs);
- and 00000004 labels represent “local common” areas, which are areas where the title of the land is in doubt and multiple adjacent owners may have some rights or interest in it.
- Much like PIDs, Property Assessment Numbers (PANs) must be 8 characters long, and often feature leading zeroes.
- Some examples of valid PANs are 04400197 and 04924612.
- If multiple results are returned, users can click on the "Goto" binocular icon to jump the viewport to that parcel.
- Users must specify either a name (First, Middle, Last) or an enterprise name.
- Place names are selected from a drop-down list: the system will offer suggestions as you type.
- The system will return results if as little as a valid first and last name are entered: a location is not required.
- If multiple results are returned, users can click on the "Goto" binocular icon to jump the viewport to that parcel.
- If searching using book and page numbers, both book and page number are required to produce a result.
- If the document number is known, that can be entered to acquire a specific result.
- The county and year fields will filter results if necessary, but neither field is required to retrieve a result.
- If multiple results are returned, users can click on the "Goto" binocular icon to jump the viewport to that parcel.
- Plan number or plan name are required.
- The registration date and county fields are present to filter results when searching by name.
- Searching by plan number should only return a single result.
- If multiple results are returned, users can click on the "Goto" binocular icon to jump the viewport to that parcel.
- Much like when searching by PAN above, entering a PAN will typically return a single result.
- The other two fields can also be used, but they may return multiple responses depending on the query.
- If multiple results are returned, users can click on the "Goto" binocular icon to jump the viewport to that parcel.
- This option uses a single field and a drop-down list that offers suggestions to you as you type.
- Clicking on one of the suggestions will populate the field with that suggestion.
- Clicking "Find" will then generate a list of areas that match those criteria. Clicking the link in the entry will center the viewport on the coordinates listed.
- If entering coordinates manually, they will need to be in the following format: X: XXXXXXX; Y: YYYYYYY.
- Each coordinate should be 7 digits, and not have any decimal points.
- For example, entering X:2633988, Y:7456744 will center on the Moncton traffic circle.
- If searching by Geodesic coordinates, those are selectable from the drop-down boxes, with a range of selectable coordinates from 44 to 49 degrees north and 63 to 70 degrees west.
- A broad variety of data is displayed whenever a user clicks on a PID number within this applet. This data includes the following:
- PID number and status;
- parcel interest holders;
- assessment references (with links to the PAN data);
- any associated documents and plans;
- and any other data related to that PID.
- A broad variety of data is displayed whenever a user clicks on a PAN number within this applet. This data may includes the following:
- PAN number and status;
- associated PIDs;
- and sale price information, if available.
- The Land Gazette is a repository of permanent and temporary land related notices and associated information.
- Land Gazette Information is supplied by the owner of that data, and any reports list the data owner. Service New Brunswick is not liable for any loss or damage of any kind from errors, deficiencies or faults therein, whether such loss or damage is caused by the negligence of agents or employees of Service New Brunswick or of the data owner, or otherwise.
- Parcels that have land gazette records are displayed as a darker shade of green (closer to a grey shade) than those parcels without land gazette “flags”, which appear as a lighter green shade.
- Not every parcel has additional information beyond the parcel and assessment information, but some parcels may include the following data:
- Historical land use plans;
- and documents such as deeds, mortgages and title transfers.
PLANET Mapping Interface (PMI) Overview
Applet Navigation
Navigation Bar  |
|
Navigation Pane Manipulation  |
Applet Tools
Point Select  |
|
Lasso Select  |
|
Select Neighbours  |
|
Whose Is It?  |
|
Layers  |
|
Basemaps  |
|
Attribute Information  |
|
Measurement  |
|
Print  |
Search Options
Quick Search |

|
Search by PID |
|
Search by PAN |
|
Search by Name or Location |
|
Search by Document |
|
Search by Plan |
|
Search by Assessment |
|
Search by Place Name |
|
Search by Coordinates |
Menu Navigation
Accessing PID Reports |
|
Accessing PAN Reports |
|
Accessing Land Gazette Information |
|
Accessing Additional and Historical Information
|